

How To Make A Contact Sheet In Photoshop Cs5
Back when Adobe'southward Creative Suite 4 was launched, many people bemoaned the fact that an old favorite plug-in, Picture Packet (Contact Sheet Two) and its associated Spider web Gallery counterpart, had been retired. Well, not completely gone, because even in the latest version of CS5 you can yet get the old plugins from Adobe, every bit explained in this postal service from John Nack.
Notwithstanding, while these plug-ins are euphemistically called "optional," the smart thinkers will be reading between the lines and considering them "on their way out." What's a hard working artistic supposed to practise for contact sheets? The functions have been moved and enhanced, but y'all have to know where to look. And, "where to look" is in the Output workspace of Bridge CS5 (CS4 works similarly, if you're still using that version).
In this tip, we'll look at the Contact Sheet feature. If you want to see the all-time way to produce a flexible Moving picture Package, look to my previous tip on the bailiwick.
In Span, select the images you want to want to include in your contact canvas. Then, at the meridian of the Span window, select "Output" to change to the Output Workspace.

Once in the Output Workspace, note several changes that accept occurred:
- The "Content" panel has moved to the lesser and has become a filmstrip.
- The "Preview" panel is now front and heart, containing all the images yous have currently selected.
- The "Output" console now occupies the entire right side console

With this, we accept what nosotros need to create a contact sheet. Permit'south start at the top of the Output panel, and work our way down. At the top, we see this:
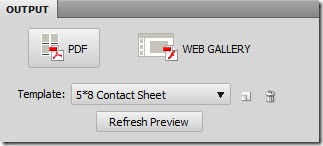
With this panel, we select whether we are going to direct our output to a PDF (for press, email, etc) or to a spider web gallery. For now, we will choice "PDF" and so click the dropdown list to cull the template. We'll choice "5*8 Contact Sail," but detect the other options available (and annotation that you can relieve your own as well):

Now that we've selected the 5×eight contact canvas, let's become ahead and click the "Refresh Preview" button, which will requite united states our first output preview:

Once yous click "Refresh Preview," a NEW panel opens, called the "Output Preview" panel. Note that the original Preview console is still there, but at present at that place are ii tabbed panels. Within the Output Preview panel, is a rendering of our PDF contact sheet, start try:

Clicking on the Output Preview zooms in, Alt/Selection clicking zooms out. Looking at the correct side console, we have an accordion panel with all sorts of options for customization of this PDF. The options in a quick summary are:
- Document: Set your paper size, background color, and epitome quality. Yous tin also gear up a countersign for security in opening the PDF.
- Layout: The parameters are gear up for our five x viii thumbnails, but you lot can customize the number of rows and columns, margins and gutters, and gear up whether to car rotate for best fit.
- Overlays: For our 5 10 eight preset, the overlays are configured to display the file name and file extension. You can command the text font and colour, and y'all tin add folio numbering every bit well.
- Header and Footer: allow you to add text per page, with options for text font, size and color.
- Playback: In the section, you tin choose to create a PDF that will open in full screen, and can play every bit a slideshow (non particularly useful for contact sheets).
- Watermark: Y'all can add a text or graphical watermark to appear on each image.
As you make changes, you can click the "Refresh Preview" button to see the results. Once you've set the options to taste, you lot can save the preset (equally nosotros mentioned above) by clicking the icon next to the preset name:

Later on you've created the settings y'all desire, simply click "Salvage…" at the bottom of the panel and you'll be prompted to name your file and choose the location to salvage it. Yous can also check the box at the bottom to "View PDF Subsequently Save." Once you've saved out the PDF, you tin distribute it as desired:

The Bridge Output workspace is where all the heavy output lifting gets done in Creative Suite 4 and 5. Get to know this panel, as y'all tin can bet that Adobe will proceed to add new features and functions here in the futurity. Next fourth dimension here on TipSquirrel, nosotros'll wait at creating a Web Contact Sheet, and after that, y'all'll never fret over the old "optional" plug-ins once more.
sixty Comments on Contact Sheets in Photoshop CS5
Source: https://www.tipsquirrel.com/contact-sheets-in-photoshop-cs5/
Posted by: chungandutimmose1944.blogspot.com
0 Response to "How To Make A Contact Sheet In Photoshop Cs5"
Post a Comment